From our CSA this week, we received more flavorful salad greens, mustard greens, 2 pints of strawberries, & a bunch of radishes. We hadn't even finished our first set of salad greens yet! Plus, we've had 3 weeks of strawberries. PLUS! We've still have copious amounts of ramps & scallions. What to do!!
So, tonight I made a white pizza with ramps & a strawberry salad. It was a very nice balanced meal. PLUS!! We had a nice white wine with the meal.
Nice.
Just a warning - don't be afraid of the number of ramps. Ramps are much mellower than garlic or scallions/leeks. Don't fear the ramps!
Here's the basic recipe:
White pizza with ramps
10 ramps
1/4 cup parmesan cheese
1 or 3/4 cup shredded Italian cheese (we used Sargento's reduced fat Italian blend)
3/4 cup ricotta cheese
2-3 tablespoons dried basil (or a handful of fresh basil)
1-2 tablespoons dried oregano
1 tomato, diced
1 pizza crust
So, I did a dirty, clever trick with the tomato. I purchased an heirloom tomato from the crappy Giant near me (not the super nice Giant). Mostly, heirloom tomatoes have tons of tomato flavor, which is indicated by their scent & their minimal travel time. However, I screwed up & chose a random heirloom without a good scent that traveled from Canada. After I chopped the tomato, I sprinkled it with a very small amount of sugar & a ton of basil. Then, it tasted more tomatoey. It wasn't perfect, but it was better than tasting like water.
Basically, the pizza crust is topped with ricotta cheese, then 1/2 of the ramps, the seasonings, then the tomatoes, then the shredded cheese. (Jeff says that you can cook all of the ramps in the pizza. I liked a few of them raw on top. But taste a raw ramp & choose your own adventure!) Sprinkle the top with the parmesan. Also, I brushed the exposed crust with some olive oil & sprinkled with some parmesan.
Bake for 30 minutes at 350 degrees. Top the pizza with the rest of the ramps & (if you're feeling feisty, some fresh arugula leaves).
Enjoy with a nice white wine, such as a 2007 Cascina del Pozzo Arneis Roero (Italian white table wine - cheap!). Also, make a nice green salad & top with sliced strawberries & balsamic vinaigrette.
Very Spring-y!
Aside: Ramps are SUPER ULTRA good pan-fried with potatoes. Just add the ramps near the end of the cooking. Nice onion/garlic flavor with potatoes - very good!!
Showing posts with label Spring. Show all posts
Showing posts with label Spring. Show all posts
Sunday, May 16, 2010

Friday, May 14, 2010
Italian Love Affair Soup
Annette here: One of my roommates' from college mom used to make a huge pot of Tortellini Soup and bring it over to us sometimes. It is delicious and very filling. Since I've yet to find gluten free Tortellini and I like to limit the dairy, I used meatballs instead. Also, my visiting brother requested it. So it's not quite Italian Wedding Soup....instead... it's am Italian love affair! Vegetarians, feel free to ignore the meatballs and use the original Tortellini instead. Vegans can do it with vegan Tortellini or just add in more Quinoa for balanced protein. YUM!
 Italian Love Affair Soup
Ingredients:
1 small head of cabbage, chopped
1 Tablespoon Grape Seed Oil (or other medium-high heat oil of your choice)
5-6 stalks of celery, chopped
1 1/2 cups of carrots, chopped
4 cloves of garlic, minced
1/2 teaspoon salt (the Hawaiian red salt is my favorite!)
1 medium onion, chopped
4 green onions, chopped
2 zucchini, chopped
1 15oz can of cannellini beans
1/2 cup Quinoa (just dried....not cooked)
1 28oz can diced tomatoes
Fresh herbs*: basil, oregano, thyme, rosemary, parsley--about 1/2 cup total
2 Tablespoons Italian Seasoning
3 cups water
48oz broth (veggie, chicken or combo)
Optional: 1 package Tortellini
Lots of leftover tomato products! (I used 16oz of tomato soup & 16oz of crushed tomatoes.... the original recipe from my roommate's mom says: "It's now time to clean out your fridge. Anything tomato based you have in there can go in the soup." I have yet to try ketchup....and I'm thinking it's a good idea to stay away from it for this. :) V8 is good in here if you're a V8 drinker.)
* I started growing my own herbs this spring so I have lots of yummy, FREE herbs! It's really easy if you have a sunny spot. You just have to water them. I probably wouldn't go buy a package of all of these...they're expensive. Just use two more Tablespoons of the dried Italian Seasoning.
For the meatballs:
1/2 cup GF Italian bread crumbs (I love Gillian Foods!)
1 pound ground beef (or turkey)
1 egg
1/4 cup chopped fresh parsley (or 1 Tablespoon dried)
Directions for Meatballs
In a medium bowl combine all the ingredients. Roll in to small quarter sized balls and fry in a skillet over medium heat until they become a little browned on most of the sides. DO NOT EAT...they are still raw and will finish cooking in the soup.
Directions for the soup:
Chop, chop, chop lots of veggies. Toss chopped cabbage, onions, carrots, celery, garlic and Grape Seed Oil in a large stock pot. I'm talking large here. Saute until soft, about 15 minutes. Toss in salt, fresh herbs, Italian seasoning, green onions, diced tomatoes, tomato products, broth, and the meatballs. Bring to a boil and then simmer on low heat for an hour or more. The longer and slower you cook it the better it tastes. I cooked my pot today for 4 hours. As your cooking, watch the liquid level. I added about 3 cups of water, but you might want less or more depending on how long you're cooking it. Thirty minutes before calling it done add in the beans, Quinoa, zucchini, and uncooked Tortellini if you're using it. Serve it up with some nice whole grain bread and dinner is served!
For my brother's ranking: tasty, good, so good, SO good, SOOOOO good... this got a SO good!

Ingredients:
1 small head of cabbage, chopped
1 Tablespoon Grape Seed Oil (or other medium-high heat oil of your choice)
5-6 stalks of celery, chopped
1 1/2 cups of carrots, chopped
4 cloves of garlic, minced
1/2 teaspoon salt (the Hawaiian red salt is my favorite!)
1 medium onion, chopped
4 green onions, chopped
2 zucchini, chopped
1 15oz can of cannellini beans
1/2 cup Quinoa (just dried....not cooked)
1 28oz can diced tomatoes
Fresh herbs*: basil, oregano, thyme, rosemary, parsley--about 1/2 cup total
2 Tablespoons Italian Seasoning
3 cups water
48oz broth (veggie, chicken or combo)
Optional: 1 package Tortellini
Lots of leftover tomato products! (I used 16oz of tomato soup & 16oz of crushed tomatoes.... the original recipe from my roommate's mom says: "It's now time to clean out your fridge. Anything tomato based you have in there can go in the soup." I have yet to try ketchup....and I'm thinking it's a good idea to stay away from it for this. :) V8 is good in here if you're a V8 drinker.)
* I started growing my own herbs this spring so I have lots of yummy, FREE herbs! It's really easy if you have a sunny spot. You just have to water them. I probably wouldn't go buy a package of all of these...they're expensive. Just use two more Tablespoons of the dried Italian Seasoning.
For the meatballs:
1/2 cup GF Italian bread crumbs (I love Gillian Foods!)
1 pound ground beef (or turkey)
1 egg
1/4 cup chopped fresh parsley (or 1 Tablespoon dried)
Directions for Meatballs
In a medium bowl combine all the ingredients. Roll in to small quarter sized balls and fry in a skillet over medium heat until they become a little browned on most of the sides. DO NOT EAT...they are still raw and will finish cooking in the soup.
Directions for the soup:
Chop, chop, chop lots of veggies. Toss chopped cabbage, onions, carrots, celery, garlic and Grape Seed Oil in a large stock pot. I'm talking large here. Saute until soft, about 15 minutes. Toss in salt, fresh herbs, Italian seasoning, green onions, diced tomatoes, tomato products, broth, and the meatballs. Bring to a boil and then simmer on low heat for an hour or more. The longer and slower you cook it the better it tastes. I cooked my pot today for 4 hours. As your cooking, watch the liquid level. I added about 3 cups of water, but you might want less or more depending on how long you're cooking it. Thirty minutes before calling it done add in the beans, Quinoa, zucchini, and uncooked Tortellini if you're using it. Serve it up with some nice whole grain bread and dinner is served!
For my brother's ranking: tasty, good, so good, SO good, SOOOOO good... this got a SO good!
Wednesday, April 28, 2010
Pierogies
From the kitchen of Christine:
 My mother bought me this amazing cookbook "The Heart of Pittsburgh" A Cookbook from Historic Pittsburgh. One of the best recipes is for Pierogies, though time consuming, well worth the effort. I modified the directions and the filling.
Pierogies
Ingredients:
Dough:
2 cups of flour (Use Better Batter if Gluten Free)
1/2 teaspoon salt
1 egg, lightly beaten
1 Tablespoon vegetable oil
1/2 cup very hot water
Potato Filling:
2 cups mashed potatoes
1/2 medium onion finely chopped, sauteed in butter until soft
1/3 pound shredded cheese (I use Boar's Head Cheddar)
Directions:
Put potatoes on to boil. Let boil 10 minutes.
 Dough: Mix the flour and salt. Beat together the egg and oil. Make a well in the flour mixture, and pour egg mixture, and using a fork, begin to mix the dough. Add the hot water; continue mixing until a soft dough forms. On a floured surface, lightly knead dough until no longer sticky. Add flour as necessary. Cover dough with plastic wrap; set aside to rest for 30 minutes.
Mash the potatoes. In a large bowl, combine the mashed potatoes, onion and cheese. Season with salt and pepper.
Put a large pot of water on to boil.
On a lightly floured surface, roll out dough to 1/8 inch thickness. Using a biscuit cutter, or inverted glass, cut dough into 3 or 4 inch circles. Spoon filling into center of each circle. Fold dough in half over top of filling to form a semi-circle. Using wet fingers, dampen the edges and press together to seal. Crimp edges with a fork.*
Working in batches, place pierogies in boiling salted, water. Boil for 4 to 5 minutes. Pierogies will float to top when done. Remove with a slotted spoon. Let sit for a minute or 2.
Heat some vegetable or olive oil in a frying pan. Place 4 or 6 pierogies in pan. Fry until golden brown. Turn once. Serve warm.

*You may freeze pierogies at this time. Put on a cookie sheet and do not let them touch. Once frozen, you can put them in a bag.
Enjoy!
Christine

Pierogies
Ingredients:
Dough:
2 cups of flour (Use Better Batter if Gluten Free)
1/2 teaspoon salt
1 egg, lightly beaten
1 Tablespoon vegetable oil
1/2 cup very hot water
Potato Filling:
2 cups mashed potatoes
1/2 medium onion finely chopped, sauteed in butter until soft
1/3 pound shredded cheese (I use Boar's Head Cheddar)
Directions:
Put potatoes on to boil. Let boil 10 minutes.

Mash the potatoes. In a large bowl, combine the mashed potatoes, onion and cheese. Season with salt and pepper.
Put a large pot of water on to boil.
On a lightly floured surface, roll out dough to 1/8 inch thickness. Using a biscuit cutter, or inverted glass, cut dough into 3 or 4 inch circles. Spoon filling into center of each circle. Fold dough in half over top of filling to form a semi-circle. Using wet fingers, dampen the edges and press together to seal. Crimp edges with a fork.*
Working in batches, place pierogies in boiling salted, water. Boil for 4 to 5 minutes. Pierogies will float to top when done. Remove with a slotted spoon. Let sit for a minute or 2.
Heat some vegetable or olive oil in a frying pan. Place 4 or 6 pierogies in pan. Fry until golden brown. Turn once. Serve warm.

*You may freeze pierogies at this time. Put on a cookie sheet and do not let them touch. Once frozen, you can put them in a bag.
Enjoy!
Christine
Sunday, April 25, 2010
First try: Ravioli
Keri here again with a recipe using my brand new pasta maker! I haven't seen gluten-free raviolis yet... Plus, I doubt that they'll ever have pumpkin, butternut squash, or more creative fillings until many years in the future. This year, the man surprised me with a pasta maker to allow me to create pirogies, raviolis, flavored pastas, etc. Let the creativity begin!
We figured that I'd start with something rather basic for my first ravioli recipe. Now, I want to warn you: This isn't an amazing recipe. It's a first try at making homemade ravioli. It was pretty good, but there's room for improvement.
Firstly, the ravioli filling needs to be almost overwhelmingly flavorful. It needs to be able to stand up to the pasta dough - even though the dough is rolled thin.
Secondly, the dough needed to be rolled with a rolling pin prior to going through the pasta maker. Otherwise, the pasta maker couldn't catch the dough.
After that preface, here are my recipes:
Gluten-free pasta dough
I used Mario Batali's Fresh Pasta recipe as a base. For those of you not doing a gluten-free pasta, feel free to use his instead of mine.
4 eggs
3 1/2 cups Jules' Gluten-free flour mix
1/2 cup water (more or less)
Mound the flour in the center of a large wooden cutting board. Make a well in the middle of the flour, add the eggs. Using a fork, beat together the eggs and begin to incorporate the flour starting with the inner rim of the well. As you incorporate the eggs, keep pushing the flour up to retain the well shape.
Start kneading the dough with both hands, primarily using the palms of your hands. If the dough has trouble coming together, add 1/4 cup water. Keep adding water until it becomes a cohesive mass. Gluten-free flour tends to be thirsty, but be sparing after the first 1/4 cup of water. If you overdo it, the pasta maker will shred the dough into little pieces. (Hint: If this happens - just add a little more flour, knead again, & re-roll.)
Remove the dough from the board and scrape up any left over dry bits. Lightly flour the board and continue kneading for 3 more minutes. The dough should be elastic and a little sticky. Continue to knead for another 3 minutes, remembering to dust your board with flour when necessary. Wrap the dough in plastic wrap and set aside for 20 minutes at room temperature. (Hint: Keep most of the dough wrapped until needed.)
Roll 1/4 of the dough with rolling pin until 1/4-1/8 inch thin. Feed through pasta roller at largest setting. Then, feed through pasta roller at the ravioli setting. Cut sheet into large rounds. Add a very small dollop of ravioli into the center of a round. Wet the outer edge of the round. Top with another round & press down gently to seal. You can use a fork to flute the edges if you're feeling crafty. (Hint: If the dough tears, use a dough "band-aid." Wet a small bit of dough, & gently press into the tear. Boiling the pasta makes most of these look fairly normal. Plus, there's sauce, right??)
When done with the prep work, boil the raviolis until they float. Top with sauce, & Done!!
Ravioli filling
1/2 lb. ground pork
1/2 cup ricotta cheese
8 leaves fresh basil, chopped
2 tablespoons dried Italian seasoning
2 tablespoons olive tapenade (optional)
1 teaspoon garlic powder
1 teaspoon red pepper flakes
Cook pork on stove top until browned. Remove from heat, & place pork into large mixing bowl. Add ricotta, basil, seasoning, & tapenade. Taste. Add salt & pepper. Add more flavorings as needed. If you need, add other/more seasonings - Remember: It should be almost overwhelmingly flavorful.
Sauce
1/4 cup grape tomatoes, quartered
1/4 cup diced roasted red peppers plus 1 teaspoon liquid from jar
2 tablespoons finely chopped sundried tomatoes plus 1 tablespoon oil from jar
3 leaves fresh basil, chopped
Mix all ingredients. Taste. Add salt/pepper. Done!

(This item was cross-posted to Twice If It's Nice.)
We figured that I'd start with something rather basic for my first ravioli recipe. Now, I want to warn you: This isn't an amazing recipe. It's a first try at making homemade ravioli. It was pretty good, but there's room for improvement.
Firstly, the ravioli filling needs to be almost overwhelmingly flavorful. It needs to be able to stand up to the pasta dough - even though the dough is rolled thin.
Secondly, the dough needed to be rolled with a rolling pin prior to going through the pasta maker. Otherwise, the pasta maker couldn't catch the dough.
After that preface, here are my recipes:
Gluten-free pasta dough
I used Mario Batali's Fresh Pasta recipe as a base. For those of you not doing a gluten-free pasta, feel free to use his instead of mine.
4 eggs
3 1/2 cups Jules' Gluten-free flour mix
1/2 cup water (more or less)
Mound the flour in the center of a large wooden cutting board. Make a well in the middle of the flour, add the eggs. Using a fork, beat together the eggs and begin to incorporate the flour starting with the inner rim of the well. As you incorporate the eggs, keep pushing the flour up to retain the well shape.
Start kneading the dough with both hands, primarily using the palms of your hands. If the dough has trouble coming together, add 1/4 cup water. Keep adding water until it becomes a cohesive mass. Gluten-free flour tends to be thirsty, but be sparing after the first 1/4 cup of water. If you overdo it, the pasta maker will shred the dough into little pieces. (Hint: If this happens - just add a little more flour, knead again, & re-roll.)
Remove the dough from the board and scrape up any left over dry bits. Lightly flour the board and continue kneading for 3 more minutes. The dough should be elastic and a little sticky. Continue to knead for another 3 minutes, remembering to dust your board with flour when necessary. Wrap the dough in plastic wrap and set aside for 20 minutes at room temperature. (Hint: Keep most of the dough wrapped until needed.)
Roll 1/4 of the dough with rolling pin until 1/4-1/8 inch thin. Feed through pasta roller at largest setting. Then, feed through pasta roller at the ravioli setting. Cut sheet into large rounds. Add a very small dollop of ravioli into the center of a round. Wet the outer edge of the round. Top with another round & press down gently to seal. You can use a fork to flute the edges if you're feeling crafty. (Hint: If the dough tears, use a dough "band-aid." Wet a small bit of dough, & gently press into the tear. Boiling the pasta makes most of these look fairly normal. Plus, there's sauce, right??)
When done with the prep work, boil the raviolis until they float. Top with sauce, & Done!!
Ravioli filling
1/2 lb. ground pork
1/2 cup ricotta cheese
8 leaves fresh basil, chopped
2 tablespoons dried Italian seasoning
2 tablespoons olive tapenade (optional)
1 teaspoon garlic powder
1 teaspoon red pepper flakes
Cook pork on stove top until browned. Remove from heat, & place pork into large mixing bowl. Add ricotta, basil, seasoning, & tapenade. Taste. Add salt & pepper. Add more flavorings as needed. If you need, add other/more seasonings - Remember: It should be almost overwhelmingly flavorful.
Sauce
1/4 cup grape tomatoes, quartered
1/4 cup diced roasted red peppers plus 1 teaspoon liquid from jar
2 tablespoons finely chopped sundried tomatoes plus 1 tablespoon oil from jar
3 leaves fresh basil, chopped
Mix all ingredients. Taste. Add salt/pepper. Done!

(This item was cross-posted to Twice If It's Nice.)
Saturday, April 24, 2010
Food & Wine Steak with Herb Nut Salsa
Keri here with a review of a recipe and wine pairing!
Tonight, the man & I had steak with an herb nut salsa. The recipe came with our Food & Wine Adventurer Club wine shipment.
Aside: Food & Wine introduced two wine clubs last Fall/Winter: a collector edition & an adventurer edition. They ship us 6 bottles with a recipe booklet that pairs each wine with a primary recipe (& 3 alternates). Some wineries also do the same, which is pretty awesome.
The wine was really good for a cheapy wine, & it paired really well with the recipe. Good job, Food & Wine!!
Wine: Domaine de Baumard - Logis de la Giraudière - 2005. Fancy name for a red table wine... but it is really nice. Don't pay over $20 for it. Rating: 3.5/5
 Recipe: Hanger Steak with Herb Nut Salsa Rating: 3.5/5
The salsa was salty herby goodness - So, I made very simple sides: roasted potatoes & onions with very little salt & some pepper and halved grape tomatoes with leftover herbs, basil, & shallot. Both cleansed the palate nicely after bites of the steak/salsa & sips of the wine. We made a few minor modifications: no tarragon, no chervil, anchovy paste in lieu of anchovies, less oil.
Also, ignore the recipe's note about 12 minutes for toasting the hazelnuts. Toast until fragrant, & don't wander away. Otherwise, it's a mad dash to open the door, turn on the fan, & cover the smoke detector.
Overall, the dish was very good together. We will probably make this again when the vegetable & herb garden is in full force. I recommend the wine & recipe together as a semi-fancy meal.
(This item was cross-posted to Twice If It's Nice.)
Tonight, the man & I had steak with an herb nut salsa. The recipe came with our Food & Wine Adventurer Club wine shipment.
Aside: Food & Wine introduced two wine clubs last Fall/Winter: a collector edition & an adventurer edition. They ship us 6 bottles with a recipe booklet that pairs each wine with a primary recipe (& 3 alternates). Some wineries also do the same, which is pretty awesome.
The wine was really good for a cheapy wine, & it paired really well with the recipe. Good job, Food & Wine!!
Wine: Domaine de Baumard - Logis de la Giraudière - 2005. Fancy name for a red table wine... but it is really nice. Don't pay over $20 for it. Rating: 3.5/5
 Recipe: Hanger Steak with Herb Nut Salsa Rating: 3.5/5
The salsa was salty herby goodness - So, I made very simple sides: roasted potatoes & onions with very little salt & some pepper and halved grape tomatoes with leftover herbs, basil, & shallot. Both cleansed the palate nicely after bites of the steak/salsa & sips of the wine. We made a few minor modifications: no tarragon, no chervil, anchovy paste in lieu of anchovies, less oil.
Also, ignore the recipe's note about 12 minutes for toasting the hazelnuts. Toast until fragrant, & don't wander away. Otherwise, it's a mad dash to open the door, turn on the fan, & cover the smoke detector.
Overall, the dish was very good together. We will probably make this again when the vegetable & herb garden is in full force. I recommend the wine & recipe together as a semi-fancy meal.
(This item was cross-posted to Twice If It's Nice.)
Wednesday, April 14, 2010
Granola Goodness
In my quest to find a granola made with gluten free oats I decided to make my own. I found this recipe on Allrecipes.com but added my own changes to make it a bit healthier and sugar free. However, this recipe uses a few controversial ingredients. Scientists and nutritionists are continually making changes on what "healthy" means. After growing up with the "It's okay! It's Fat Free" of the 80s and then the "Anything Low-Carb" of the 90s and 2000s, I've become a huge fan of the Michael Pollan's school of thought and just my general idea that things are okay in moderation provided that it's something natural as opposed to derived from science. (Not that I'm against science by any means! Go Darwin!) So bring on the controversial ingredients featured in the granola:
 Coconut Oil: Killed in the press in the 1980s because of it's high saturated fat content and because of the over processed version, coconut oil is regaining popularity because some believe that it's actually good for you. Search online and find articles about this tasty oil (and fruit and milk...) and make up your own mind.


Coconut Palm Sugar: This recipe is the first time I've ever cooked with this sweetener but I'm starting to experiment with it as a sugar alternative. Really any sweetener in large quantities is bad for most of us humans so I try not to eat too much of my drug of choice. However, I'm trying to find the best one and this on has good reputation.
 Agave Nectar: This sweetener caused major controversy in the land of "fru-fru" sweeteners. First it was the wonder sweetener, then it was bad, then it was good, and now....who knows? So, again, I use it in moderation. I know that when I eat things made with it, I want more of the baked good later but I don't CRAVE it like I do when I eat thing made with regular, old sugar.

Ground Flax Seeds: Okay, no one has a problem with this one these days but I have heard/read that it's best to eat these freshly ground and not to cook them. So, if you want the most Omega 3's from these tiny seeds, buy them whole and ground them yourself then sprinkle them on the just out of the oven granola.
Are we done with the theory? Let's get on to the tastiness! Be aware...this makes a ton and it's also delicious! Gluten Free Friends--you might want to start off slow and work your way up to a real portion of this because sometimes even gluten free oats are a bit much for our tummies to take on.Granola Goodness
Adapted from Megan's Granola
Ingredients

- 8 cups rolled oats
- 1 1/2 cups Quinoa Flakes
- 1/2 cup ground flax seeds
- 1/4 cup sunflower seeds
- 1 cup sliced almonds
- 1 cup finely chopped pecans
- 1 cup finely chopped walnuts
- 1 1/2 teaspoons salt
- 1/4 cup palm sugar
- 1/4 cup agave nectar
- 1/2 cup honey
- 1/4 cup molasses
- 2/3 cup coconut oil
- 1 tablespoon ground cinnamon
- 1 tablespoon vanilla extract
- 2 cups raisins or sweetened dried cranberries
Directions
- Preheat the oven to 325 degrees F. Line two large baking sheets with parchment paper.
- Combine the oats, quinoa flakes, sunflower seeds, almonds, pecans, and walnuts in a large bowl. Stir together the salt, palm sugar, agave nectar, honey, oil, cinnamon, and vanilla in a saucepan. Bring to a boil over medium heat, then pour over the dry ingredients, and stir to coat. Spread the mixture out evenly on the baking sheets.
- Bake in the preheated oven until toasted, about 20 minutes. Stir once halfway through. Once out of the oven sprinkle on the ground flax seeds and stir. After about 20 minutes out of the oven it will become crispy. Cool, then stir in the raisins or cranberries before storing in an airtight container.
Friday, April 9, 2010
No-Picture Thai Chicken Stir-Fry with Coconut Rice
That's right.... I committed the cardinal sin of blogging. I have no picture of this. However, it was delicious so I should share it with you. I'll have to update this post in the future when I make this again. For some reason I procrastinated on making this dish. The ingredients sat in my fridge for over a week. They were just about to start getting bad when I finally realized I was stalling because I didn't want to eat stuffed cabbage rolls. Stir Fry! Problem Solved.
Thai Chicken Stir-Fry with Coconut Rice
Inspired by: Thai Chicken in Cabbage Leaves
(pg. 276) 2009 Cooking Light Annual Recipes
Ingredients:
1 pound boneless/skinless chicken breast, cut into strips
 1 red pepper, sliced into strips
1/2 cup shredded carrots
1 napa* cabbage, sliced into strips
1 sliced red onion
1 lime
3 Tablespoons chopped fresh mint
1/4 cup fresh chopped cilantro
4 teaspoons Thai Fish Sauce
1 Tablespoon Dark Sesame Oil
1 bunch chopped green onions
crushed peanuts (optional)
*It's Chinese Cabbage...not wine country!
Directions:
(If making the Coconut Rice...start that before cooking the stir-fry.)
In a large-ish skillet with large sides (or a wok if you have one!) toss in the chicken, juice from the lime, fish sauce, and sesame oil. Cook over medium heat until chicken is mostly done. Then toss in the sliced red pepper, carrots, onions, cabbage and cook until chicken is finished and vegetables are tender. Take off the heat and mix in the mint, green onions, crushed peanuts, and cilantro. Server over rice.
Coconut Rice
Ingredients:
1 1/2 cups brown jasmine rice
1 can coconut milk (you can go low fat if you want but there are rumors that coconuts are actually good for you! :) )
Directions:
Cook rice as directed on your package or toss into a rice cooker* except instead of 3 cups water, use the coconut milk. I also added about 1/4 cup of water just to thin it out a bit. When it's tender, serve with the stir fry. This also tastes amazing with a little spritz of lime juice.
*My man got ours free from Coke Reward Points! Thank you fellow office workers obsessed with their cokes! I would highly recommend getting a little $20 rice cooker if you're a big fan of rice dishes. It makes it so easy.
Vegetarian/Vegan Option: Take out the chicken and fish sauce and instead use a little soy sauce, tofu or shelled edamame, extra veggies like mung bean sprouts/more peppers/broccoli/water chestnuts... play around with it and have fun.
Thai Chicken Stir-Fry with Coconut Rice
Inspired by: Thai Chicken in Cabbage Leaves
(pg. 276) 2009 Cooking Light Annual Recipes
Ingredients:
1 pound boneless/skinless chicken breast, cut into strips

1/2 cup shredded carrots
1 napa* cabbage, sliced into strips
1 sliced red onion
1 lime
3 Tablespoons chopped fresh mint
1/4 cup fresh chopped cilantro
4 teaspoons Thai Fish Sauce
1 Tablespoon Dark Sesame Oil
1 bunch chopped green onions
crushed peanuts (optional)
*It's Chinese Cabbage...not wine country!
Directions:
(If making the Coconut Rice...start that before cooking the stir-fry.)
In a large-ish skillet with large sides (or a wok if you have one!) toss in the chicken, juice from the lime, fish sauce, and sesame oil. Cook over medium heat until chicken is mostly done. Then toss in the sliced red pepper, carrots, onions, cabbage and cook until chicken is finished and vegetables are tender. Take off the heat and mix in the mint, green onions, crushed peanuts, and cilantro. Server over rice.
Coconut Rice
Ingredients:
1 1/2 cups brown jasmine rice
1 can coconut milk (you can go low fat if you want but there are rumors that coconuts are actually good for you! :) )
Directions:
Cook rice as directed on your package or toss into a rice cooker* except instead of 3 cups water, use the coconut milk. I also added about 1/4 cup of water just to thin it out a bit. When it's tender, serve with the stir fry. This also tastes amazing with a little spritz of lime juice.
*My man got ours free from Coke Reward Points! Thank you fellow office workers obsessed with their cokes! I would highly recommend getting a little $20 rice cooker if you're a big fan of rice dishes. It makes it so easy.
Vegetarian/Vegan Option: Take out the chicken and fish sauce and instead use a little soy sauce, tofu or shelled edamame, extra veggies like mung bean sprouts/more peppers/broccoli/water chestnuts... play around with it and have fun.
Wednesday, April 7, 2010
Fagioli
About a year ago I downloaded a pdf of The Vegan Culinary Experience--Dairy Free Italian but never really cooked from it. The other day I opened it up and picked out this recipe to make for dinner. An hour before dinner I read the recipe more carefully and because of time and my desire to eat carrots & celery... made some major modifications...and came up with this:
 Here's the original recipe:
The Vegan Culinary Experience – Education, Inspiration, Quality * www.veganculinaryexperience.com February 2009
Recipe by Chef Jason Wyrick
Fagioli
Type: Main Dish, Italian (Tuscan) Serves: 4
Time to Prepare: 1 hour 45 minutes
Ingredients
1 yellow onion, chopped
2 celery stalks, chopped
2 carrot, chopped
3 cloves of garlic, smashed
2 bay leaves
4 cups of water (should reduce to 2 cups)
1⁄2 cup of tomato paste
2 cloves garlic, minced
1 tbsp. of chopped sage leaves
2 tbsp. of olive oil
1⁄2 tsp. of salt
1⁄2 tsp. of freshly ground pepper
3 cups of cannellini beans, rinsed
1 bunch of spinach, chopped
4 slices of Tuscan (or other Italian) bread, toasted
Instructions
Chop the onion, celery, and carrots and smash the garlic.
Simmer the onion, celery, carrot, garlic, and bay leaves in the water for about 40 minutes.
Drain and reserve the liquid, discarding the veggies.
Mince the 2 cloves of garlic.
Chop the sage.
Mix the liquid with the tomato paste, garlic, sage, olive oil, salt, and pepper.
Mix the tomato sauce you just made with the beans.
Place this in a baking dish and cover it.
Bake it on 400 degrees for 45 minutes.
While the beans bake, wilt the spinach leaves in a dry pan over a medium heat.
Once the beans are done, mix the spinach in with them.
This should be served with a side of Tuscan toast.
Here's what I did:
Quick Fagioli
Ingredients:
1 yellow onion, chopped
2 celery stalks, chopped
2 carrot, chopped
3 cloves garlic, minced
1 14oz can of plain tomato sauce
1/2 cup water
2 tbsp. of olive oil
1⁄2 tsp. of salt
1⁄2 tsp. of freshly ground pepper
3 cups of cannellini beans (white kidney beans), drained & rinsed
1 bunch of spinach, chopped
Directions:
Chop the onion, celery and carrots (or use the food processor to do it for you like I did). Adding olive oil, sautee the veggies and the garlic over medium heat in a pan until soft. Pour into a casserole dish. Add the tomato sauce, salt, pepper, water, drained beans, and Italian Seasoning. Cover and cook in the oven on 400 degrees for 45 minutes. Wilt the spinach leaves in a pan over medium heat and add to the bean mixture when it comes out of the oven. Serve with some GF bread sticks.
Easy Gluten Free Bread Sticks
Follow the directions on the back of the Bob's Red Mill Gluten Free Pizza Crust. However, instead of rolling it into a pizza crust, flour your hands and roll them into bread sticks. I put them on a baking sheet, drizzle some olive oil and dump tons of garlic powder and Italian Seasonings on top. Bake in the oven at 425*F for 15-18 minutes. YUM! (Just looked at the top picture closer and realized I ran out of time to make bread sticks. Instead we had this baguette. Don't want to confuse you if you're bread sticks don't look like the picture!)
 We also ate this meal with a quick Strawberry Salad--Red leaf lettuce, sliced strawberries, pecans, olive oil, balsamic vinegar*, and a quick grind of pepper.
*If you're a balsamic vinegar fan like I am you might find this very disappointing....

The Vegan Culinary Experience – Education, Inspiration, Quality * www.veganculinaryexperience.com February 2009
Recipe by Chef Jason Wyrick
Fagioli
Type: Main Dish, Italian (Tuscan) Serves: 4
Time to Prepare: 1 hour 45 minutes
Ingredients
1 yellow onion, chopped
2 celery stalks, chopped
2 carrot, chopped
3 cloves of garlic, smashed
2 bay leaves
4 cups of water (should reduce to 2 cups)
1⁄2 cup of tomato paste
2 cloves garlic, minced
1 tbsp. of chopped sage leaves
2 tbsp. of olive oil
1⁄2 tsp. of salt
1⁄2 tsp. of freshly ground pepper
3 cups of cannellini beans, rinsed
1 bunch of spinach, chopped
4 slices of Tuscan (or other Italian) bread, toasted
Instructions
Chop the onion, celery, and carrots and smash the garlic.
Simmer the onion, celery, carrot, garlic, and bay leaves in the water for about 40 minutes.
Drain and reserve the liquid, discarding the veggies.
Mince the 2 cloves of garlic.
Chop the sage.
Mix the liquid with the tomato paste, garlic, sage, olive oil, salt, and pepper.
Mix the tomato sauce you just made with the beans.
Place this in a baking dish and cover it.
Bake it on 400 degrees for 45 minutes.
While the beans bake, wilt the spinach leaves in a dry pan over a medium heat.
Once the beans are done, mix the spinach in with them.
This should be served with a side of Tuscan toast.
Here's what I did:
Quick Fagioli
Ingredients:
1 yellow onion, chopped
2 celery stalks, chopped
2 carrot, chopped
3 cloves garlic, minced
1 14oz can of plain tomato sauce
1/2 cup water
2 tbsp. of olive oil
1⁄2 tsp. of salt
1⁄2 tsp. of freshly ground pepper
3 cups of cannellini beans (white kidney beans), drained & rinsed
1 bunch of spinach, chopped
Directions:
Chop the onion, celery and carrots (or use the food processor to do it for you like I did). Adding olive oil, sautee the veggies and the garlic over medium heat in a pan until soft. Pour into a casserole dish. Add the tomato sauce, salt, pepper, water, drained beans, and Italian Seasoning. Cover and cook in the oven on 400 degrees for 45 minutes. Wilt the spinach leaves in a pan over medium heat and add to the bean mixture when it comes out of the oven. Serve with some GF bread sticks.
Easy Gluten Free Bread Sticks
Follow the directions on the back of the Bob's Red Mill Gluten Free Pizza Crust. However, instead of rolling it into a pizza crust, flour your hands and roll them into bread sticks. I put them on a baking sheet, drizzle some olive oil and dump tons of garlic powder and Italian Seasonings on top. Bake in the oven at 425*F for 15-18 minutes. YUM! (Just looked at the top picture closer and realized I ran out of time to make bread sticks. Instead we had this baguette. Don't want to confuse you if you're bread sticks don't look like the picture!)
 We also ate this meal with a quick Strawberry Salad--Red leaf lettuce, sliced strawberries, pecans, olive oil, balsamic vinegar*, and a quick grind of pepper.
 *If you're a balsamic vinegar fan like I am you might find this very disappointing....
Friday, April 2, 2010
Ultimate Chili

To celebrate, we threw a "Release Party" with a ton of chili.
When I make chili I don't really measure anything so it never turns out exactly the same. Feel free to increase or lower the amount of things in here to fit your taste buds. But whatever you do, make sure to include the secret ingredients... it makes all the difference!
Ultimate Chili
Ingredients

1 28oz can of diced tomatoes, (w/green chilies or w/o)
1 can garbanzo beans (chickpeas)*
1 can black beans*
1 can dark red kidney beans*
*OR you can do 1/2 cup dried beans and let them soak overnight in water. Then dump out the soaking water and cook them on the stove in fresh, boiling water for 10 minutes. Drain.
1 green pepper, chopped
1 red pepper, chopped
1 yellow or orange pepper, chopped
1 red onion, diced
3 cloves of minced garlic (or more, or less...)
1 pound browned & drained ground beef or turkey
1 package spicy sausage (My Favorite Cajun Style Andouille found here)
1 Tablespoon Chili Powder (or more, or less...)
1 Tablespoon Ground Cumin (or more, or less...)
1/2 teaspoons sea salt (or more, or less...)
Dash of Cayenne Pepper
Secret Ingredient: 2-4oz of good quality unsweetened dark chocolate (YUP! That's right... I said Chocolate!) (Ghirardelli, Dagoba, or Scharffenberger do actually taste & look different....)
Easy-have-a-lot-of-time-Directions:
Chop all the veggies (peppers, onions, garlic). Split the sausage lengthwise and then cut into 1/4 inch thick pieces. Brown the ground beef (or turkey). Make sure beans are drained of their can liquid or their soaking water (and have been heated for 10 minutes in boiling water--I've read something about a chemical kidney beans release when first heated that you're not supposed to eat? I don't know...)
Dump everything into a crockpot, stir and cook on low for 8 hours or high for 5-6.

Got-to-get-to-a-Beer-Party-Soon-Directions:
Chop all the veggies (peppers, onions, garlic). Split the sausage lengthwise and then cut into 1/4 inch thick pieces. Brown the ground beef (or turkey) in a large stockpot. Add in veggies & spices to the ground beef (you could drain the fat before adding veggies if you wanted.) Cook covered for about 7 minutes or so, just to soften everything up. Add in all the other ingredients: tomatoes, beans*, chocolate, sausage. Stir and cover. Simmer for the next 1.5-3 hours on low, stirring about every 20 minutes. The slower you cook a chili the better it will get. If it ends up being too watery, take off the lid and/or add some cornstarch. (To add cornstarch, spoon out about 1/2 cup of the liquid and add a Tablespoon of cornstarch to it. Mix it up so there aren't any lumps and pour it back in. In about 20-30 minutes you'll have a thicker chili.) Serve with some tasty cornbread (GF cornbread Represent!) and some homemade Nut Brown Ale (although....that's not gluten free!)
*Make sure beans are drained of their can liquid or their soaking water (and have been heated for 10 minutes in boiling water--there is something about a chemical kidney beans release when first heated that you're not supposed to eat? I don't know...)
Vegetarian/Vegan Option:
I've made this plenty of times before without meat and it's just as delicious. Certainly with all the beans it's packed with protein and fiber! I would however:
Increase the spices (Chili Powder, Cumin, Cayenne Pepper)
Cook in the crockpot so the beans break down a bit more and make it thicker
If you're a soy-sausage fan I'm sure it would taste great in this.
Sometimes I also add some frozen corn.....but it does make the chili sweeter.
Enjoy!
Monday, March 29, 2010
Emily's Vegetarian Curry & Hummus

Last night was generic* Middle Eastern Night at our house! I made this vegetarian curry recipe given to me by my friend Emily. She blogs about her poetry and photography here. It's awesome! You can go and check it out... I'll wait.
(Insert hold music here.)
See? I told you it's awesome! Anyway! I combined the curry with homemade hummus and blue corn tortilla chips. Overall, a delicious generic* Middle Eastern supper.
*Not sure which country this particular kind of dish would be made.
Emily's Vegetarian Curry
Ingredients
1 onion, diced
4 garlic cloves
1 Tablespoons minced fresh ginger
1 ½ Tablespoon curry powder
1 tsp. ground cumin

½ tsp salt
2 ½ cup diced potatoes
3 small med zucchini, sliced*
¾ cup dry roasted, unsalted cashews
1 TBsp lemon juice
Rice (whatever kind you like. I used a Texmati Blend)
Plain yogurt ( I used a plain, unsweetened soy yogurt)
Ingredients 2 cups canned garbanzo beans, drained 1/3 cup tahini 1/4 cup lemon juice 1 teaspoon salt | 2 cloves garlic, minced 1/4 cup Extra Virgin olive oil paprika |

Thursday, March 25, 2010
Strawberry Shortcake


So all week long I read the above book to my second graders. It's a great story about the Little Red Hen's Great-Grandson who makes Strawberry Shortcake with the help of an iguana, turtle, and pot-bellied pig. So after reading this for the 4th time in a week I craved Strawberry Shortcake!
Gluten Free Strawberry Shortcake
- Make the recipe for Classic Drop Biscuits from The Almond Flour Cookbook by Elana from Elana's Pantry. I would give you the recipe but if you are gluten free then you should totally go buy this cookbook. Promise...it's worth it! And check out her blog because it's a great resource!
- Clean and slice a bunch of strawberries.
- Whip 1 1/2 cups heavy cream, 1-2 Tablespoons Agave Nectar, and 1 Tablespoon Vanilla until frothy, whipped-cream goodness! Just make sure not to turn it into butter (aka. don't whip too much!)
- Layer a drop biscuit, whipped cream, strawberries, and repeat.
- Dig in with a fork and ENJOY! It's summer in your mouth! Even though it's spring right now...
Great Granny's Magnificent Strawberry Shortcake
Ingredients
2 cups all-purpose flour, sifted
2 Tablespoons sugar
1 Tablespoon baking powder
1/2 teaspoon salt
1/2 cup butter
1 egg, beaten
2/3 cup milk
3-4 cups strawberries, washed & sliced
1 cup whipping cream, whipped
 Directions
 Preheat oven to 350*F. Sift flout, then sift together dry ingredients. Cut in butter until mixture is coarse crumbs. Add in beaten egg and milk, stirring by hand just enough to moisten. Spread dough in greased 8 1/2 inch round pan, building up edges slightly. Bake 15-18 minutes. Remove cake from pan; cool on rack 5 minutes. Split into two layers; lift top off carefully. Alternate layers of cake, whipped cream, and strawberries, ending with strawberries on top.
Thursday, March 18, 2010
Spring Starts with a Salad
My tulips have decided it's spring. Well, they actually decided that awhile ago and then the snowpocalypse hit. The snow has melted and the tulips are continuing their growth towards the sun. To celebrate our week of 60*F afternoons I made a quick fried chicken salad last night. This salad is always a quick and easy spring or summer meal for us. Hopefully you'll enjoy it too.

Fried Chicken Salad
Ingredients:
Adapted from: All Recipes
Ingredients:
Mix all ingredients together in a container with a lid so you can easily store any leftover. Because it's really a dipping sauce, more than a dressing, a little of this goes a long way. I just took the mixing spoon and used it to drizzle some of the sauce over the top of our salads. Enjoy!

Fried Chicken Salad
Ingredients:
- Red Leaf Lettuce
- cherry or grape tomatoes
- cucumbers
- shredded carrots (I didn't have these on hand last night but they really add some fun!)
- enough pieces of fried chicken breasts for each person (whatever that is to you)
- Gluten free fans: Bell and Evens
- Gluten Eaters: Trader Joes Breaded Chicken Tenderloin Breasts
- some kind of creamy dressing--normally I love Drew's Smoked Tomato on this, but I ran out so I made the honey mustard dressing below.
- Wash and tear the lettuce. Chop the cucumbers any size you like. Cut tomatoes in half or keep them whole. Put everything in a communal bowl or divide up for individual bowls (single serving is my preference for this salad) and top with shredded carrots and chicken. Drizzle on some dressing and you're good to go!
- I served it with a baked sweet potato topped with butter. Both together make a filling, healthy, quick meal!
Adapted from: All Recipes
Ingredients:
- 1/2 cup mayonnaise
- 3 Tablespoons Mustard (I used a combo of Spicy Brown and Dijon. I wouldn't recommend using regular yellow mustard.)
- 1 1/2 Tablespoons Honey
Mix all ingredients together in a container with a lid so you can easily store any leftover. Because it's really a dipping sauce, more than a dressing, a little of this goes a long way. I just took the mixing spoon and used it to drizzle some of the sauce over the top of our salads. Enjoy!
Wednesday, March 17, 2010
Thai Peanutty Noodles
The first time I ever went out for Thai food was the first (AND LAST) time I came down with a case of the drinking flu. Long after college, after a failed attempt to go to West Virginia and go skiing, a few friends consoled ourselves by having a fun night at our apartment filled with peppermint patty shots. You know what I'm talking about right? Pour some Hershey's syrup in your mouth and chase it with Peppermint Schnapps. Anyway, later the next day, when I was able to eat again, we went out for Thai. Perhaps it was because it was the first thing I ate all day, or maybe it was just because it is amazingly delicious, but I was a convert of the flavors right away.
By far my favorite dish is Pad Thai, and this recipe is the closest I've ever come to recreating the flavors of that first experience. (The good flavors/experience...not that bad one.... )
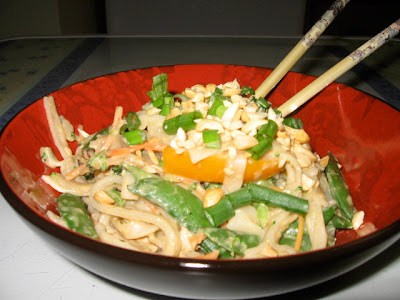
Thai Peanutty Noodles
Adapted from: All-New Complete Cooking Light Cookbook, 2006. Pg. 280.
Ingredients:
1 pound uncooked rice noodles
1 1/2 cups shredded carrots
1 Tablespoon Canola oil
2 teaspoons grated, peeled fresh ginger
3 garlic cloves, minced
1 cup chicken broth (feel free to use lower sodium)
1/2 cup natural style unsweetened peanut butter (ex: Smucker's)
1/4 cup low sodium soy sauce (I use GF Tamari)
3 Tablespoons rice vinegar
1 teaspoon Sriracha Sauce (This particular brand
MAY be contaminated with Gluten but it works for me)
1/4 teaspoon salt
1 pound boneless, skinless chicken breast cut in strips or bite-sized chunks
Cooking Spray
2 cups red bell pepper strips
1 pound snow peas or sugar snap peas (I like the sugar snap better.)
1/2 cup chopped fresh cilantro
1/4 cup crushed peanuts
1/4 cup chopped green onions
Directions:
Cook the noodles according to the directions (minus any salt or fat), drain, and set aside.
Heat 1 teaspoon oil in a skillet with high sides (so you can fit lots in later!) on medium heat. Add in ginger, minced garlic and saute for 30 seconds or so. Add in chicken broth, peanut butter, soy sauce, vinegar, chili garlic sauce, and salt and stir until it's blended. Add in your cut up chicken, cover and simmer over low--ish heat until the chicken is cooked through. If you have room in your pan add in your veggies--carrot strips, peppers, & peas--and cook until they are still slightly crisp but not raw. (Or you can cook them to death like my Grandmother does....your choice!) If you don't have room in your pan, then just saute the veggies in a separate pan and mix in later.
Mix in the cooked and drained rice noodles and you're good to go!
Serve topped with crushed peanuts, cilantro, and green onions. Yum yum yum!
Feel free to play around with this one. Take out the chicken, use veggie broth instead and it's vegetarian/vegan. Mix and match your stir-fry veggies all you want. You could use shrimp instead if you're a seafood fan! Experiment and make it your own!
By far my favorite dish is Pad Thai, and this recipe is the closest I've ever come to recreating the flavors of that first experience. (The good flavors/experience...not that bad one.... )

Thai Peanutty Noodles
Adapted from: All-New Complete Cooking Light Cookbook, 2006. Pg. 280.
Ingredients:
1 pound uncooked rice noodles
1 1/2 cups shredded carrots
1 Tablespoon Canola oil
2 teaspoons grated, peeled fresh ginger
3 garlic cloves, minced
1 cup chicken broth (feel free to use lower sodium)
1/2 cup natural style unsweetened peanut butter (ex: Smucker's)
1/4 cup low sodium soy sauce (I use GF Tamari)
3 Tablespoons rice vinegar
1 teaspoon Sriracha Sauce (This particular brand
MAY be contaminated with Gluten but it works for me)
1/4 teaspoon salt
1 pound boneless, skinless chicken breast cut in strips or bite-sized chunks
Cooking Spray
2 cups red bell pepper strips
1 pound snow peas or sugar snap peas (I like the sugar snap better.)
1/2 cup chopped fresh cilantro
1/4 cup crushed peanuts
1/4 cup chopped green onions
Directions:
Cook the noodles according to the directions (minus any salt or fat), drain, and set aside.
Heat 1 teaspoon oil in a skillet with high sides (so you can fit lots in later!) on medium heat. Add in ginger, minced garlic and saute for 30 seconds or so. Add in chicken broth, peanut butter, soy sauce, vinegar, chili garlic sauce, and salt and stir until it's blended. Add in your cut up chicken, cover and simmer over low--ish heat until the chicken is cooked through. If you have room in your pan add in your veggies--carrot strips, peppers, & peas--and cook until they are still slightly crisp but not raw. (Or you can cook them to death like my Grandmother does....your choice!) If you don't have room in your pan, then just saute the veggies in a separate pan and mix in later.
Mix in the cooked and drained rice noodles and you're good to go!
Serve topped with crushed peanuts, cilantro, and green onions. Yum yum yum!
Feel free to play around with this one. Take out the chicken, use veggie broth instead and it's vegetarian/vegan. Mix and match your stir-fry veggies all you want. You could use shrimp instead if you're a seafood fan! Experiment and make it your own!
Subscribe to:
Posts (Atom)

 Posts
Posts


