Monday, March 29, 2010

Emily's Vegetarian Curry & Hummus

Last night was generic* Middle Eastern Night at our house!  I made this vegetarian curry recipe given to me by my friend Emily.  She blogs about her poetry and photography here.  It's awesome!  You can go and check it out... I'll wait.

(Insert hold music here.)

See? I told you it's awesome!  Anyway!  I combined the curry with homemade hummus and blue corn tortilla chips.  Overall, a delicious generic* Middle Eastern supper.
*Not sure which country this particular kind of dish would be made.   

Emily's Vegetarian Curry
Ingredients
¼ cup oil (I used a bit less..)
1 onion, diced
4 garlic cloves
1 Tablespoons minced fresh ginger
1 ½ Tablespoon curry powder
1 tsp. ground cumin
14oz can diced tomatoes (no need to drain)
½ tsp salt
2 ½ cup diced potatoes
3 small med zucchini, sliced*
¾ cup dry roasted, unsalted cashews
1 TBsp lemon juice
Rice (whatever kind you like. I used a Texmati Blend)
Plain yogurt ( I used a plain, unsweetened soy yogurt)


*The zucchini in the store looked gross, so I opted for the asparagus that was on sale.  It worked well.  

Directions: 

Begin cooking your rice according to the package. I just throw mine in our rice cooker. 
Heat oil in a large frying pan. Add onion, garlic, and ginger and saute 5 minutes.  Mix in curry powder and cumin and cook two minutes to toast spices.  Add tomatoes and 1 cup water and bring to a boil.  Stir in potatoes and cover pan.  Cook at a gentle simmer until potatoes are tender, about 20 minutes.  Stir occasionally.  Remove the cover of the pan and add zucchini and cashews.  Cook uncovered until zucchini are tender, about 10 minutes.  Mix in lemon juice. Serve over rice with a spoonful of plain yogurt on top.  YUM.  (You might notice that there is no yogurt on top in the picture.... I forgot it until I took my first bite!  Then I hopped to add it....it makes a big difference in the taste.) 


Homemade Hummus
Adapted from Hummus III on All Recipes
Ingredients 
2 cups canned garbanzo beans, drained
1/3 cup tahini
1/4 cup lemon juice
1 teaspoon salt
2 cloves garlic, minced
1/4 cup Extra Virgin olive oil
paprika


Directions: 
 Cook the garbanzo beans (chick peas) in water on the stove for about 10-15 minutes, or until they are softened.  Cool them in a bowl of cold water.  Drain. Toss beans, tahini, lemon juice, salt, garlic and olive oil into a food processor or manly blender.  Process away until smooth! I like to add some water or olive oil as it processes to help it come to a smooth constancy.  When it's the way you like it, spoon it out into a bowl and make a well in the middle.  Pour a little olive oil in the center and sprinkle paprika around it for the full Middle Eastern Restaurant effect.  Enjoy!

Thursday, March 25, 2010

Strawberry Shortcake

Okay...Okay... I  know Strawberry Shortcake is not dinner food. But I'm not a founding member of the dessert club for nothing! I have to post some desserts snacks on here! Because this is NOT a dessert...oh no. It's a snack.  Yes...um...a snack.
                                                                              Source

So all week long I read the above book to my second graders.  It's a great story about the Little Red Hen's Great-Grandson who makes Strawberry Shortcake with the help of an iguana, turtle, and pot-bellied pig.  So after reading this for the 4th time in a week I craved Strawberry Shortcake!

Gluten Free Strawberry Shortcake
  • Make the recipe for Classic Drop Biscuits from The Almond Flour Cookbook by Elana from Elana's Pantry.  I would give you the recipe but if you are gluten free then you should totally go buy this cookbook.  Promise...it's worth it! And check out her blog because it's a great resource!
  • Clean and slice a bunch of strawberries. 
  • Whip 1 1/2 cups heavy cream, 1-2 Tablespoons Agave Nectar, and 1 Tablespoon Vanilla until frothy, whipped-cream goodness!  Just make sure not to turn it into butter (aka. don't whip too much!) 
  • Layer a drop biscuit, whipped cream, strawberries, and repeat.  
  • Dig in with a fork and ENJOY!  It's summer in your mouth! Even though it's spring right now...
 Now because I know most of you don't need to purchase the expensive bag of almond flour.... here's the glutened recipe from the back of Cook-a-Doodle-Doo: 

Great Granny's Magnificent Strawberry Shortcake

Ingredients
2 cups all-purpose flour, sifted
2 Tablespoons sugar
1 Tablespoon baking powder
1/2 teaspoon salt
1/2 cup butter
1 egg, beaten
2/3 cup milk
3-4 cups strawberries, washed & sliced
1 cup whipping cream, whipped

Directions
Preheat oven to 350*F.  Sift flout, then sift together dry ingredients.  Cut in butter until mixture is coarse crumbs. Add in beaten egg and milk, stirring by hand just enough to moisten.  Spread dough in greased 8 1/2 inch round pan, building up edges slightly.  Bake 15-18 minutes. Remove cake from pan; cool on rack 5 minutes.  Split into two layers; lift top off carefully.  Alternate layers of cake, whipped cream, and strawberries, ending with strawberries on top.

Saturday, March 20, 2010

Beef & Leek Potpie with Chive Crust

It makes for a bad picture, but an excellent meal!

A few years back I subscribed to Cooking Light.  I love their recipes.  They are frequently labor intensive and often have many unusual ingredients.  However, every recipe I've tried from them tastes delicious!  D.E.L.I.C.I.O.U.S.  But after about a year of receiving the magazines, I had quite a messy pile of them waiting to be cooked from.  There had to be a better way.
Enter the Annual Recipes Collection.  At the end of each year, Cooking Light publishes a book with all their recipes from the year.  One of my favorite parts is that they are organized by month so it's easy to find recipes that match the season.

Okay...I just have to interrupt this post for a second.  As I write this there is a frantic squirrel on my deck digging through my flower pots.  I was watching it, totally confused as to why it was digging through two geraniums that had been inside all winter and thinking it has lost its mind.  Then I realized, that those two plants were not in that exact spot last summer/fall.  However, the geraniums that were there, both mysteriously sprouted oak trees this spring.  Looks like my squirrel hid two acorns inside my geraniums but I messed up its plan by bringing them inside.  Wow....to have the memory of a squirrel.  Sorry... I digress!

So, this recipe was listed in the March section.  It's a great cold weather dish for those days when you want to curl up with a cozy, hearty meal.  It made a lot for us (about 9 portions--I poured some of the filling into a smaller container and froze it to be eaten later.)


Beef and Leek Potpie with Chive Crust
Adapted from Cooking Light Annual Recipes 2009

(This can be easily made into a hearty vegetarian meal.  Just take out the beef and substitute veggie broth for the beef broth.  Maybe add some green beans to mix up the veggies in the filling.) 

Ingredients: 
Crust: 
  • 1 1/4 cups Flour (I used Bob's Red Mill GF All Purpose Flour but Better Batter would work better! I just didn't have any.) 
  • 2 Tablespoons chopped fresh chives
  • 1/4 teaspoon salt
  • 1/4 cup Earth Balance Shortening
  • 1/4 cup ice water (I ended up using more.... GF flour is thirsty!)


Filling: 
  • 1 1/2 pounds lean beef cut into 1-inch cubes (I just get whatever is low in fat & on sale!) 
  • 4 thinly sliced leeks (How to slice a leek video)
  • 1 1/2 cups chopped carrots
  • 1 cup chopped celery
  • 1 teaspoon minced garlic
  • 1 teaspoon chopped fresh rosemary
  • 1 teaspoon dried thyme 
  • 1/2 cup red wine
  • 2 1/4 cups beef broth (low-sodium or not...your choice) 
  • 1/2 tablespoon cornstarch
  • 1 1/2 cups cubed potatoes (I used yukon gold) 
  • 1 cup frozen peas
  • 3/4 teaspoon salt
  • ground pepper to taste
  • cooking spray

Prepare the Crust: 

  1. Mix flour, chives, salt in a medium bowl with a whisk or fork.  
  2. Cut in shortening with two knives or a pastry blender until it's crumbly.  
  3. Sprinkle ice water over flour mixture a little at a time and mix with a fork until it's crumbly but moistish.  (Yes.  Mositish is a technical term.) 
  4. Press into a ball, cover, and put in the fridge to chill. 

Make the filling: 
  1. Preheat oven to 400*F for later when the pie is ready to cook in the oven. 
  2. Heat a large saute pan (I have a nice one with tall sides) or Dutch Oven over medium heat on the stovetop and coat with cooking spray.  Add in beef and cook until browned on all sides. 
  3. Toss in leeks, carrots, celery, and garlic and cook until softened. 
  4. Add in rosemary, thyme, wine, beef broth, and potatoes and bring to a boil.  
  5. When it boils, turn down the heat so the mixture cooks at a low simmer and cook covered until the potatoes are soft (about 15 minutes). 
  6. Add in the peas, salt and pepper. 
  7. Spoon out about a 1/4 cup of the liquid and mix with the cornstarch until smooth.  Then pour back into the pan and stir.  
  8. Remove from the heat and keep covered until you're ready to assemble. 
Assembling the Pie:

    For all you gluten eaters out there you'll find this step easy.  You roll out the dough as normal, easily move to the top of the filling and you're done.  Us, Gluten Free Fans begin to sweat when the thought of having to move GF dough from one surface to the other.  (Or is that just me?)  For some tips on a GF pie crust see Amy's blog here.
  1. Take the dough out of the fridge and put it on a long piece of parchment paper with some (GF) flour sprinkled underneath the dough.  
  2. Place another piece of parchment paper on top of the dough and roll it out using a rolling pin to a size where it will fit whatever size pan you're using for the potpie. 
  3. Take the top layer of parchment paper off carefully. 
  4. Pour your filling into your pan.  (I used a Corning Ware oval baking dish.) 
  5. Carefully take your parchment paper with the rolled out crust and flip it onto the top of your potpie filling.  
  6. Then peel off the parchment paper and you should be good to go.
  7. Cut 5 slits for the steam to escape (or maybe all the holes in your GF dough are there on purpose!) 
  8. Bake in the oven for about 20 minutes or until browned.  
FYI: I ended up having enough dough for my large potpie (5 servings)  but not my small one. I just froze the smaller one (4 servings) sans crust and will make the crust before I eat it again.

We ate ours with the leftover red wine and a nice garden salad.   Enjoy!

Thursday, March 18, 2010

Spring Starts with a Salad

My tulips have decided it's spring.  Well, they actually decided that awhile ago and then the snowpocalypse hit.  The snow has melted and the tulips are continuing their growth towards the sun.  To celebrate our week of 60*F afternoons I made a quick fried chicken salad last night.  This salad is always a quick and easy spring or summer meal for us.  Hopefully you'll enjoy it too.

Fried Chicken Salad

Ingredients:
  • Red Leaf Lettuce
  • cherry or grape tomatoes
  • cucumbers
  • shredded carrots (I didn't have these on hand last night but they really add some fun!)
  • enough pieces of fried chicken breasts for each person (whatever that is to you) 
  • some kind of creamy dressing--normally I love Drew's Smoked Tomato  on this, but I ran out so I made the honey mustard dressing below.
Directions:
  • Wash and tear the lettuce.  Chop the cucumbers any size you like.  Cut tomatoes in half or keep them whole.  Put everything in a communal bowl or divide up for individual bowls (single serving is my preference for this salad) and top with shredded carrots and chicken. Drizzle on some dressing and you're good to go!  
  • I served it with a baked sweet potato topped with butter.  Both together make a filling, healthy, quick meal! 
Honey Mustard Sauce
Adapted from: All Recipes

Ingredients:
  • 1/2 cup mayonnaise
  • 3 Tablespoons Mustard (I used a combo of Spicy Brown and Dijon.  I wouldn't recommend using regular yellow mustard.) 
  • 1 1/2 Tablespoons Honey
Directions:
     Mix all ingredients together in a container with a lid so you can easily store any leftover.  Because it's really a dipping sauce, more than a dressing, a little of this goes a long way.  I just took the mixing spoon and used it to drizzle some of the sauce over the top of our salads. Enjoy!

Wednesday, March 17, 2010

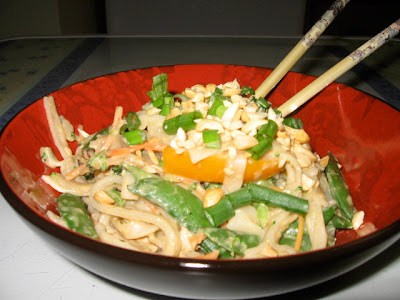
Thai Peanutty Noodles

The first time I ever went out for Thai food was the first (AND LAST) time I came down with a case of the drinking flu. Long after college, after a failed attempt to go to West Virginia and go skiing, a few friends consoled ourselves by having a fun night at our apartment filled with peppermint patty shots.  You know what I'm talking about right?  Pour some Hershey's syrup in your mouth and chase it with Peppermint Schnapps.  Anyway, later the next day, when I was able to eat again, we went out for Thai.  Perhaps it was because it was the first thing I ate all day, or maybe it was just because it is amazingly delicious, but I was a convert of the flavors right away.

By far my favorite dish is Pad Thai, and this recipe is the closest I've ever come to recreating the flavors of that first experience.  (The good flavors/experience...not that bad one.... )


Thai Peanutty Noodles
Adapted from: All-New Complete Cooking Light Cookbook, 2006.  Pg. 280.


Ingredients: 
1 pound uncooked rice noodles
1 1/2 cups shredded carrots
1 Tablespoon Canola oil
2 teaspoons grated, peeled fresh ginger
3 garlic cloves, minced
1 cup chicken broth (feel free to use lower sodium)
1/2 cup natural style unsweetened peanut butter (ex: Smucker's)
1/4 cup low sodium soy sauce (I use GF Tamari) 
3 Tablespoons rice vinegar
1 teaspoon Sriracha Sauce (This particular brand
                                            MAY be contaminated with Gluten but it works for me) 
1/4 teaspoon salt
1 pound boneless, skinless chicken breast cut in strips or bite-sized chunks
Cooking Spray
2 cups red bell pepper strips
1 pound snow peas or sugar snap peas (I like the sugar snap better.)
1/2 cup chopped fresh cilantro
1/4 cup crushed peanuts
1/4 cup chopped green onions

Directions:
      Cook the noodles according to the directions (minus any salt or fat), drain, and set aside.
      Heat 1 teaspoon oil in a skillet with high sides (so you can fit lots in later!) on medium heat.  Add in ginger, minced garlic and saute for 30 seconds or so.  Add in chicken broth, peanut butter, soy sauce, vinegar, chili garlic sauce, and salt  and stir until it's blended.  Add in your cut up chicken, cover and simmer over low--ish heat until the chicken is cooked through.  If you have room in your pan add in your veggies--carrot strips, peppers, & peas--and cook until they are still slightly crisp but not raw.  (Or you can cook them to death like my Grandmother does....your choice!) If you don't have room in your pan, then just saute the veggies in a separate pan and mix in later.

Mix in the cooked and drained rice noodles and you're good to go!

Serve topped with crushed peanuts, cilantro, and green onions.   Yum yum yum! 

Feel free to play around with this one.  Take out the chicken, use veggie broth instead and it's vegetarian/vegan.  Mix and match your stir-fry veggies all you want. You could use shrimp instead if you're a seafood fan!  Experiment and make it your own!

Thursday, March 11, 2010

Pizza Soup!

So tonight I made a quick pot of Pizza Soup.  It tastes exactly like you'd think.


Sadly for my hubby, on the way home from picking him up, he reminded me that the last time I made Pizza Soup I incessantly sang the phrase "Pizza Soup." I had forgotten until that point.  :)  Needless to say there was a lot of "I'm going to tickle you if you don't stop singing that!"  and "It's your fault for reminding me!"


Pizza Soup: 

1 15oz-can of your favorite pizza sauce
1 28oz can crushed tomatoes
1/2 package pepperoni, cut in half (I used Hormel Turkey)
1 large green pepper, chopped
1 medium onion, chopped
1 red pepper, chopped
1-2 Tablespoons Italian seasoning
1-2 cloves minced garlic
2 Italian sausages
1 to 1 1/2 cups Pasta (I used Trader Joe's GF Spiral Brown Rice Pasta) 
Extra Virgin Olive Oil

**This is just what I put in the soup, but anything that you love on pizza will work--mushrooms, broccoli, olives, sprinkling cheese on top when you serve it, etc.

Directions: First I slice the sausage down the middle and take it out of the casing.  Saute onions, garlic, and sausage in a pot with a drizzle of olive oil. (I know heating this kind of oil destroys a lot of the good fat in it....but for Italian foods I cook with it anyway!) Add in peppers (red and green).  Saute for a bit and then pour in your cans of tomatoes and sauce.  Put in the pepperoni too.  Add enough water to make the soup your desired constancy.  At this point you can also add in the pasta and cook it within the soup.  Just make sure to add a bit more water so it doesn't steal all your broth.  Or, you can cook the pasta separately and just add it in when you're ready to serve.  It's probably better cooked separately, but if time or effort is an issue, just toss it in.   Simmer the soup for about 25-30 minutes or so until the sausage is cooked.


 I served the soup with a green salad with balsamic vinegar and fresh ground pepper, and some leftover pizza crust that I spruced up.  A few weeks ago we made actual pizza so I had a plain crust left over.  I sprinkled it with olive oil, lots of garlic powder and Italian seasoning and mozzarella cheese on my man's half.  Then I baked it in a 425*F oven for 12 minutes or so.  My man loved it!  I've found that Bob's Red Mill Gluten Free Pizza Crust is the best one out there. You do have to make it from scratch, but it's far superior to any others that I've tried.

Enjoy the soup...I'm off to go sing my hubby to sleep... "Pizza soup....pizza soup...pizza soup... " :)

Sunday, March 7, 2010

Where to start? Cheescake!

So, I've had the idea to create a blog based on the dinners my new husband and I are eating each night for awhile but never got it off the ground.  I think it's time to start!  Let's get some suppers cooking shall we?  Now granted, this post isn't about a dinner (I guess it could be... but WOW! that would be quite a meal!), but I thought I'd start off with a bang.  My man's favorite dessert is cheesecake. Any kind at all. It could be plain, chocolate, fruity, New York style...it really doesn't matter.

For New Years Eve this year I made us a rockin' cheesecake (gluten free of course!).  This was not dairy free but it was mostly sugar free. 

First I started with this basic recipe but made a few changes. 

New York Style Agave Cheesecake
Ingredients:
2 cups graham crackers  crushed Pamela's GF Dark Chocolate, Chocolate Chunk
1/2 cup butter melted
4 packages (8 oz.) cream cheese, room temperature
3/4 cup Agave Nectar
1/4 cup flour Better Batter Flour (or any GF flour)
5 eggs
1/3 cup heavy cream
1 teaspoon vanilla

I also added chunks of Pamela's Cookies and chocolate chips to the batter. YUM!
Directions:
To make crust, in a small bowl stir together graham cracker crumbs and butter until well blended. Press mixture evenly onto bottom and sides of a greased 9-inch springform pan; set aside. Preheat oven to 350°F. To make filling, combine cream cheese, agave and flour in bowl of an electric mixer. Beat until smooth. Add eggs one at a time, beating well after each addition. Beat in cream and Mexican vanilla. Pour cream cheese mixture over crust, bake 15 minutes. Lower oven temperature to 200°F and bake 1 hour and 30 minutes longer or until center no longer looks wet or shiny. Turn oven off. Let cheesecake cool in oven 1 hour with oven door ajar. Remove cheesecake to a rack to cool completely. To prevent top of cheesecake from cracking during cooking, run a knife around the edge of the pan so that cake can pull away freely as it contracts. Cover and refrigerate cheesecake for at least 4 hours before serving.

Topping: 
After the cheesecake cooled I topped it with more Pamela's cookies broken up, some Glution's Gluten Free Pretzels.   On top of that I drizzled melted chocolate and some homemade caramel.It was A.M.A.Z.I.N.G. and totally unhealthy! But what a way to start the new year! :)  Enjoy!

Homemade Caramel Sauce: 
Ingredients
Makes 2 cups
  • 1 cup sugar   light agave nectar
  • 6 tablespoons (3/4 stick) cold unsalted butter, cubed
  • 1/2 teaspoon coarse salt
  • 1/2 teaspoon vanilla extract
  • 1/2 cup heavy cream

Directions
  1. In a medium saucepan, heat sugar over medium-high until melted and brown at edges, 3 minutes. With a heat-resistant spatula, pull melted sugar toward center until all sugar is melted and caramel is deep amber in color, 3 minutes more.
  2. Immediately whisk in butter, coarse salt, and pure vanilla extract (take care as mixture is extremely hot and will bubble).
  3. Whisk in heavy cream.
  4. Pour into a heatproof container and let cool. (To store, refrigerate, up to 3 weeks.)
From Everyday Food, October 2009